Revamping Your RV’s Interior:
A Guide to Replacing RV Flooring
As the owner of Ace of Spades Custom RV and Repair in Las Vegas, I’ve helped countless RV owners transform the look and feel of their homes on wheels by replacing the flooring. One of the most impactful upgrades you can make is swapping out that old, worn carpet or linoleum for a fresh, modern flooring solution. In this blog post, I’ll walk you through the process of selecting the right flooring, creating a template, cutting the material, and properly installing it in your RV.
Choosing the Perfect Flooring for Your RV
When it comes to RV flooring, not all materials are created equal. After years of experience, I’ve found that cushion-backed vinyl flooring is the ideal choice for motorhomes and travel trailers. Here’s why:
Durability: RVs experience a lot of foot traffic and can be subjected to spills, dirt, and other wear and tear. Cushion-backed vinyl are incredibly durable and can withstand the rigors of the RV lifestyle. They won’t easily scratch, dent, or fade, ensuring your floors look great for years to come.
Waterproof: One of the biggest advantages of vinyl flooring is its water-resistant properties. This is crucial in an RV, where you may encounter spills, leaks, or even the occasional flood from a malfunctioning appliance. Cushion-backed vinyl will protect your subfloor and prevent water damage.
Comfort: The cushioned backing on this flooring provides a softer, more comfortable feel underfoot compared to traditional vinyl or laminate flooring. This can make a big difference in the overall comfort of your RV, especially if you spend a lot of time on your feet.
Easy Installation: Cushion-backed vinyl is designed to be quite flexable that makes it relatively easy to install, even for DIY-ers. This can save you a significant amount of time and money compared to hiring a professional.
When selecting your vinyl flooring, be sure to choose a product specifically designed for RV use. They are typically thinner and more flexible than their residential counterparts, allowing them to better accommodate the unique subfloor conditions and movements of an RV.
Creating a Floorplan Template
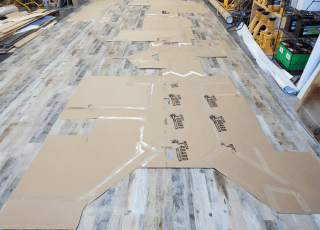
Before you can start cutting and installing your new flooring, you’ll need to create a detailed template of your RV’s floor plan. This will ensure a seamless and efficient installation process. Start by thoroughly measuring the length and width of each room or area in your RV. Be sure to measure at multiple points, as RV floors can sometimes be uneven or have slight variations in size. Record these measurements carefully, as they will be the foundation for your template. Next, use a large sheet of cardboard or a roll of paper to place in the exact area of the RV’s floor plan. Tape the cardboard paper together with the layout of the rooms, including the placement of any fixed furniture, appliances, or other obstacles. This will help you visualize how the flooring will need to be cut and installed around these elements. As you’re creating your template, be sure to mark the location of any vents, plumbing pipes, or other features that will need to be accommodated during the installation process. This will save you time and ensure a professional-looking finish.
Cutting the Flooring to Fit
With your detailed template in hand, you’re ready to start cutting the vinyl flooring to fit your RV’s unique layout. Here are a few tips to ensure a seamless and accurate cut:
Measure Twice, Cut Once: Before making any cuts, double-check your measurements and the fit of the vinly against your template. It’s better to take a few extra minutes to ensure a perfect fit than to waste valuable material.
Use the Right Tools: Invest in a sharp utility knife or a specialized vinyl cutter to make clean, straight cuts. Avoid using sissors, as this can create jagged edges and uneven lines.
Plan for Expansion: When cutting the vinly, be sure not to leave a small gap between the edges of the flooring and the walls or fixed furniture. This will allow the flooring to expand and contract with changes in temperature and humidity without buckling or warping.
Get Creative with Cuts: Navigating around obstacles like vents, pipes, and curved walls may require some creative cutting techniques. Use a jigsaw or a utility knife to carefully trim the vinyl to fit these unique shapes and spaces.
Gluing It All Together
With your flooring cut to size, it’s time to start the installation process. Cushion-backed vinyl is typically installed using a full-spread adhesive, which provides a secure and long-lasting bond. Begin by thoroughly cleaning the subfloor to remove any dirt, staples, or old adhesive residue. This will ensure the new flooring adheres properly. Next, apply the adhesive to the subfloor using a paint roller, following the manufacturer’s instructions for coverage and drying time.
Carefully place the flooring in the corner of the room, making sure it’s aligned with the wall and leaving no expansion gap. Use a roller to firmly press the vinyl into the adhesive, ensuring a tight, secure fit. Continue laying the vinyl working your way across the RV. Remember to make sure there are no expansion gaps and use a utility knife to make any necessary cuts around obstacles.
Apply firm pressure to each area to ensure a strong bond with the adhesive. Once the entire floor is installed, allow the adhesive to fully cure according to the manufacturer’s recommendations, typically 24-48 hours. During this time, avoid walking on the new flooring as much as possible.
The Finishing Touches
With the new flooring in place, you can now turn your attention to the finishing touches. Reinstall any trim or molding pieces, being careful not to damage the new flooring. You may also want to consider adding transition strips or trim pieces to create a polished, professional look at the edges of the flooring.
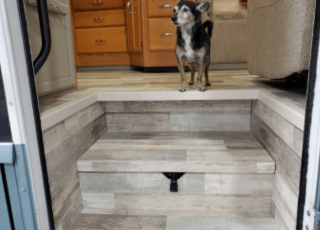
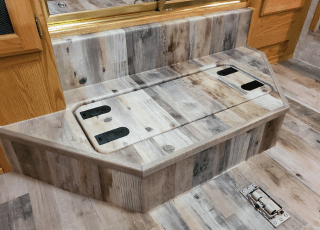
Finally, take a step back and admire your handiwork! By replacing your RV’s old, worn flooring with a durable, comfortable, and visually appealing cushion-backed vinyl system, you’ve transformed the entire look and feel of your home on wheels. Enjoy your newly refreshed RV and all the adventures that lie ahead!
Please contact us if you’d rather we professionally installed your RV flooring for you. Call us at 702-743-0347 in Las Vegas.


RV renovations RV customization rv services
